If you want privacy-first analytics that you own completely — no subscription, no third party, your data on your server — Umami is one of the friendliest places to start. It’s open source, lightweight, and runs comfortably on a small VPS. The catch is that you have to host it yourself.
Good news: with Docker, self-hosting Umami is genuinely a 20-minute job. I’ve stood it up for several clients who wanted full data ownership without the maintenance burden of Matomo. This guide walks you through how to self-host Umami with Docker, from a blank server to a live dashboard.
What You’ll Need
- A small Linux server or VPS (1 GB RAM is enough to start)
- Docker and Docker Compose installed
- A domain or subdomain pointed at the server (e.g.
analytics.yourdomain.com) - About 20 minutes
That’s it. Umami bundles its own app and connects to a database you run alongside it. You don’t need to be a sysadmin — if you can copy and paste into a terminal, you can do this.
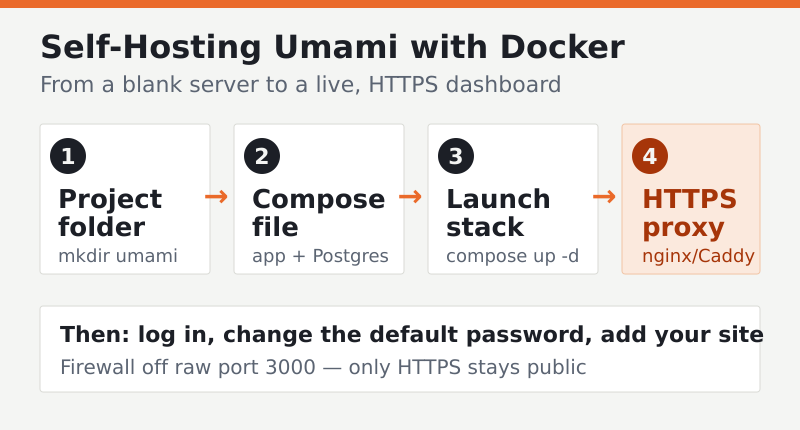
Step 1 — Create the Project Folder
SSH into your server and create a directory to hold the configuration:
mkdir umami && cd umamiEverything for this install lives in one folder, which makes backups and teardown trivial.
Step 2 — Write the Docker Compose File
Create a file named docker-compose.yml. Umami’s official docs publish a current, ready-to-use compose file that pairs the app with a PostgreSQL database — I recommend copying theirs rather than hand-rolling one, since image tags and environment variables change over time. Always pull the latest compose file from Umami’s official documentation.
A minimal version looks like this:
services:
  umami:
    image: ghcr.io/umami-software/umami:postgresql-latest
    ports:
      - "3000:3000"
    environment:
      DATABASE_URL: postgresql://umami:umami@db:5432/umami
      DATABASE_TYPE: postgresql
      APP_SECRET: replace-with-a-long-random-string
    depends_on:
      - db
    restart: always
  db:
    image: postgres:15-alpine
    environment:
      POSTGRES_DB: umami
      POSTGRES_USER: umami
      POSTGRES_PASSWORD: umami
    volumes:
      - umami-db-data:/var/lib/postgresql/data
    restart: always
volumes:
  umami-db-data:
Important: Replace
APP_SECRETwith a long random string and change the default database password before going to production. The defaults above are for illustration only.
Step 3 — Launch the Stack
From inside the folder, bring everything up:
docker compose up -dDocker pulls the images, starts PostgreSQL, runs Umami’s database migrations automatically, and launches the app on port 3000. The first run takes a minute or two. Check the logs if you’re impatient:
docker compose logs -f umamiStep 4 — Log In and Change the Default Password
Open http://your-server-ip:3000 in a browser. Umami ships with a default admin login that you’ll find in its documentation. Change this password immediately. Leaving the default credentials on a public server is the single most common mistake I see with self-hosted tools.
Step 5 — Put It Behind HTTPS
Running analytics over plain HTTP is a non-starter. Point a reverse proxy — nginx, Caddy, or Traefik — at port 3000 and terminate TLS there. Caddy is the fastest path because it handles certificates automatically:
analytics.yourdomain.com {
    reverse_proxy localhost:3000
}
Caddy fetches and renews a free certificate on its own. Now your dashboard lives at https://analytics.yourdomain.com, encrypted and tidy. If you’d rather use nginx, the proxy block is similar to the configs I walk through in our server-side tracking guide.
Step 6 — Add a Website and Install the Tracker
In the Umami dashboard, click Add website, enter your site name and domain, and Umami generates a tracking snippet — a single small script tag. Paste it into your site’s <head>. Within a few minutes, real-time visits start appearing.
For an extra accuracy boost, serve the tracker from your own domain so ad blockers don’t recognize it. This is the same custom-domain proxy trick that makes any lightweight tool more reliable.
Common Mistakes to Avoid
- Skipping the password change. The default admin account is public knowledge. Change it before the server is reachable.
- No backups. Your data lives in the PostgreSQL volume. Schedule a regular
pg_dumpor snapshot the volume. - Exposing port 3000 to the world. Once the reverse proxy is in place, firewall off the raw port so only HTTPS is public.
- Forgetting updates. Pull new images periodically with
docker compose pull && docker compose up -dto stay patched.
FAQ
Is self-hosted Umami really free?
The software is free and open source under the MIT license. Your only cost is the server it runs on, which can be a budget VPS for low-traffic sites. There’s no per-pageview pricing, so a busy site won’t suddenly cost more in software fees.
How much server power does Umami need?
Very little for typical sites. A 1 GB RAM instance comfortably handles modest traffic, since Umami’s app and database are both lightweight. Higher-traffic sites benefit from more memory and a tuned PostgreSQL, but you can start small and scale later.
Does Umami need a cookie consent banner?
Umami doesn’t use cookies and doesn’t collect personal data by default, so most sites won’t need a consent banner for it. Rules vary by jurisdiction, though, so confirm your specific obligations with a legal advisor before removing any existing banner.
Can I migrate later if I outgrow Umami?
Yes. Because you own the database, you can export your data at any time. If you eventually need funnels or richer behavioral analysis, you can move to a heavier tool while keeping your historical numbers. You’re never locked in.
Self-hosting Umami with Docker gives you something rare: privacy-respecting analytics that nobody can take away, sunset, or change the pricing on. Stand it up, point your reverse proxy at it, swap in your tracker, and you’re done. If you’re weighing self-hosted versus managed options, our Matomo vs Plausible comparison covers the broader trade-offs.